

Where To Service An Hp Officejet Pro 8500a Printer
Z7_3054ICK0KGTE30AQO5O3KA30N0
hp-concentra-wrapper-portlet
![]() Deportment
Deportment
Fixing Print Quality Problems for the HP Officejet Pro 8500A e-All-in-One Printer Series
This document is for the HP Officejet Pro 8500A e-All-in-I printers.
The quality of a printed document or photo is not as expected. The procedures in this certificate should assistance with streaked or faded printouts, colour or black ink not printing, documents with blurred or fuzzy text, ink streaks or smears, and other impress quality problems.
Solution 1: Use genuine HP cartridges
HP recommends that you use genuine HP ink or toner supplies. HP cannot guarantee the quality or reliability of non-HP or refilled cartridges. If y'all practise not use 18-carat HP cartridges, the steps in this document might not resolve the upshot. To check the authenticity of your cartridges, go to the HP anti-counterfeit webpage (in English language).
Purchase replacement cartridges and other supplies from the HP Shop or local retailers.
Solution two: Check the paper
Utilise the following guidelines to make certain that the newspaper you lot are using is appropriate for the impress job. If it is non, reload the printer with an appropriate paper type.
-
Load the paper print side down in the input tray. Many papers have press and nonprinting sides, such as photo paper and envelopes. Usually, the smoother side is the "print side," and sometimes the non-print side has a logo of the paper manufacturer on it.
-
Do not use wrinkled or curled paper. Use just clean, wrinkle-free paper.
-
Utilize the right newspaper type for your project.
-
For everyday text documents, obviously paper with ColorLok technology works well. Paper with ColorLok engineering science is industry-standard paper that works well with HP ink.

-
For documents with dense printing, such as high contrast graphics or photos, apply HP Advanced Photo Paper for best results.
-
Some paper might non absorb ink as well as others. If your prints smear easily, make sure you lot are using a recommended paper.
-
-
Store photo paper in its original packaging within a resealable plastic bag. Store the paper on a apartment surface in a cool, dry place. Load 10-20 sheets of photo paper only when you lot are ready to print, and so put the unused paper back in the packaging.
-
Endeavour using a unlike paper. This determines if the problem is related to the paper.
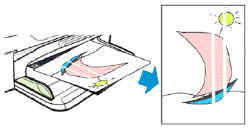
note:Inappropriate paper usually causes vertical streaks in printouts (or if the problem occurs on a re-create, dirty scanner drinking glass usually causes the event). Do non replace cartridges to set vertical streaks.
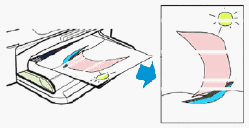
| Examples of horizontal streaks and vertical streaks in printout | |
| Figure : Horizontal streaks in printout | Keep with the post-obit troubleshooting steps if your printout contains horizontal streaks, or other print quality bug likewise vertical streaks. |
| Figure : Vertical streaks in printout | Practise non replace cartridges for vertical streaks in a printout. Instead, check the paper as described before in this certificate, or search for a certificate that covers this issue. |
After trying the preceding guidelines, effort to print again.
Solution three: Check the print settings
Follow these steps to check the print settings to make certain that they are appropriate for your print task.
This video shows how to check the print settings on the HP Officejet Pro 8500A All-in-I printer

Step i: Check the impress quality settings
Follow these steps to check the print quality settings.
-
In the software program you are trying to print from, click File, so click Impress. The Print dialog box opens.
-
Select your printer from the Proper noun drop-downward bill of fare, and so click Backdrop. The Backdrop dialog box opens.
-
Click the Newspaper/Quality tab.
-
Under Paper Source, select Tray 1 or Tray 2.
-
Review the following options, and and then brand any necessary changes.
-
Paper sizes: Make sure that the selected choice matches your newspaper size.
-
Media: If one of the options matches your paper type exactly, select that option.
-
Quality Settings: If you are dissatisfied with the quality of your printouts, increase the print quality. To print more chop-chop, decrease the print quality.
-
-
Click OK, and so click OK over again to start the impress job.
Footstep 2: Check the Print in Grayscale setting
Follow these steps to bank check the grayscale settings.
-
In the software program you are trying to print from, click File, and and so click Print. The Print dialog box opens.
-
Select your printer from the Name drib-downwards card, so click Properties. The Properties dialog box opens.
-
Click Advanced.
-
Under Printer Features, check the Impress in Grayscale setting.
-
If you are trying to impress in colour, make sure that the Impress in Grayscale setting from the drop-down card is Off.
-
If you are printing a black-and-white prototype, select Loftier Quality Grayscale to gear up streaking in blackness areas.
-
-
Click OK, and and so click OK again to start the print job.
Solution four: Print and evaluate a Print Quality Diagnostics Page
Follow these steps to print then evaluate a Print Quality Diagnostics Page. The Print Quality Diagnostics Page helps you make up one's mind if the printer needs to exist aligned, or if the printheads demand to be cleaned, or if the linefeed needs to be calibrated.
Step 1: Print and evaluate a Print Quality Diagnostics Folio
Follow these steps to impress the Print Quality Diagnostics Page.
-
Load plain white paper into the tray.
-
On the control console, touch the Right Arrow (
 ) to display the second navigation screen.
 -
Touch Setup (
 ).
). -
Touch the Downward Pointer (
 ), and and then touch Reports.
 -
Touch Print Quality Report. The Print Quality Diagnostics Page prints.
-
Printer information
-
Test Pattern 1
-
Test Blueprint 2
-
Examination Pattern 3
Effigy : Instance of a Impress Quality Diagnostics Page

-
-
Do an initial evaluation of the Print Quality Diagnostics Page.
-
If the patterns on the report evidence no defects, the impress mechanism and ink supplies are working correctly. Exercise not continue with the steps in this solution. Skip to the solution in this certificate to check the image for further troubleshooting steps.
-
If the patterns on the report are extremely streaked or are missing some portions, continue to the next step.
-
Step ii: Evaluate the ink supply tubing
Follow these steps to evaluate the ink supply tubing.
-
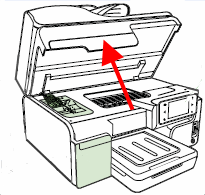
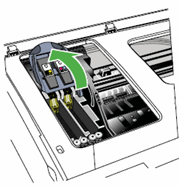
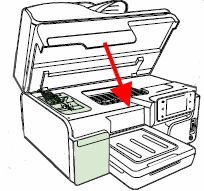
Open the railroad vehicle access door, and then bear on Change Printhead on the command panel. The carriage moves to the left side of the printer.
Effigy : Open the railroad vehicle access door
-
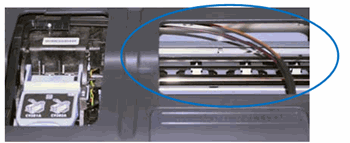
Look in the center of the printer for the iv ink tubes that connect to the printhead, and so evaluate the ink tubes. The ink tubes should exist bundled neatly, and they should non appear kinked or bent.
caution:
Practice not touch, pull, or reposition the ink tubes. Just visually audit them for kinks.
Effigy : Ink tubes, correctly arranged and non kinked
-
If the ink tubes are bundled correctly and are non kinked, keep to the next step.
-
If the ink tubes are bundled incorrectly simply practice not announced to exist kinked, skip to Service the printer in this document.
notation:
Incorrect bundling of the ink tubes does not directly crusade impress quality issues, just it is an result that must be corrected. When the printer has been serviced, continue troubleshooting with the next stride in this certificate.
-
If the ink tubes are bundled incorrectly and are kinked, read the following list, so skip to Service the printer in this certificate.
When the printer has been serviced, replace the printhead associated with the kinked tubes:
-
If the black or yellowish tube is kinked, replace the blackness and yellow printhead.
-
If the magenta or cyan tube is kinked, replace the magenta and cyan printhead.
-
-
Pace three: Evaluate Test Pattern ane
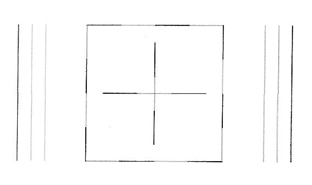
Evaluate Test Pattern 1 to make sure that the lines are straight and continued.
Figure : Instance of Exam Design 1
-
If the lines in Examination Pattern one are straight and connected, get to the next step to evaluate Test Pattern 2.
-
If the lines in Test Pattern one are not straight and connected, follow these steps to align the printheads:
-
Load plain white paper into the tray.
-
On the control panel, impact the Correct Arrow (
) to brandish the second navigation screen. -
Touch Setup (
), and and then touch on Tools. -
Touch Align Printer, and then affect OK. The alignment process begins.
-
Wait while the printer completes the alignment, and so affect OK.
-
Step 4: Evaluate Test Blueprint two
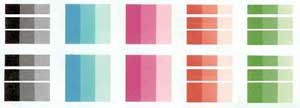
Evaluate the color blocks in Test Blueprint 2.
Figure : Example of white lines in Examination Blueprint 2
-
If in that location are white lines in whatsoever of the color blocks, follow these steps to clean the printheads.
-
Load plain white paper into the tray.
-
On the command panel, touch the Correct Arrow (
) to brandish the second navigation screen. -
Bear on Setup (
), so touch Tools. -
Touch Clean Printheads. The printer cleans the printheads.
-
Wait while the printer completes the printhead cleaning process, and and then affect OK.
-
Impress some other Print Quality Diagnostics Page.
-
How to print a Impress Quality Diagnostics Page
-
Load plain white newspaper into the tray.
-
On the control console, affect the Right Pointer (
) to display the second navigation screen. -
Touch Setup (
). -
Touch the Down Arrow (
), and then affect Reports. -
Impact Print Quality Report. The Print Quality Diagnostics Folio prints.
-
-
If there are no defects on the report, end troubleshooting.
-
If at that place are defects on the report, try another printhead cleaning.
-
-
-
If in that location are white lines through ALL the color blocks, and also white lines through the gray blocks in Test Pattern three, then practise not clean the printheads. Instead, keep to the side by side pace to evaluate Test Pattern 3.
caution:Never turn off the printer when ink cartridges are not installed. To avoid issues that require cleaning the printhead or that can damage the ink system, always supervene upon ink cartridges as presently as possible, and always turn off the printer using the Power push button.
Pace v: Evaluate Test Pattern 3
Evaluate Examination Design iii.
Figure : Example of lines and gaps in Exam Pattern 3
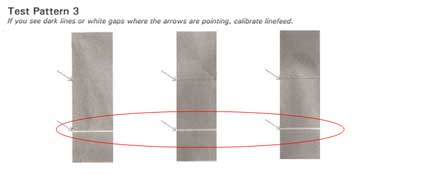
If any of the gray blocks testify dark lines or white gaps where the arrows are pointing, follow these steps to calibrate the linefeed:
-
Load plain white newspaper into the tray.
-
On the control panel, touch the Right Arrow (
) to brandish the 2d navigation screen. -
Touch Setup (
), and then touch Tools. -
Bear on Calibrate Linefeed. The printer calibrates the linefeed.
-
Wait while the printer completes the calibration, then impact OK.
-
Print another Print Quality Diagnostics Page.
-
How to print a Print Quality Diagnostics Page
-
Load plain white paper into the tray.
-
On the control panel, touch the Right Pointer (
) to display the second navigation screen. -
Bear upon Setup (
). -
Touch on the Down Arrow (
), and then touch Reports. -
Touch Print Quality Report. The Print Quality Diagnostics Page prints.
-
-
If in that location are no defects on the report, end troubleshooting.
-
If there are however dark lines or white gaps in Test Blueprint 3, skip to Service the printer in this certificate.
-
Solution five: Check the image
If you lot see no defects on the print quality diagnostic study, the print machinery and ink supplies are working correctly. There is no reason to clean, marshal or calibrate, or to supplant printheads or ink cartridges. Instead, attempt these solutions:
-
Recheck the showtime steps in this document. Many not-HP media could be incompatible with HP inks and printing systems. HP cannot guarantee the quality of non-HP inks.
-
Make sure that the image you are printing has sufficient resolution. Images that have been enlarged also much might announced fuzzy or blurry.
-
If the problem is confined to a band most the edge of a printout, utilize the software you installed with the product, or another software plan to rotate the image 180°. The trouble might non appear on the other end of the printout.
Solution 6: Replace ane or both printheads
Follow these steps to replace one or both printheads.
If you have a lacking cartridge or printhead, information technology might be under warranty. To bank check the warranty on your ink or toner supplies, go to Printer and Page Yield Overview, and then review the limited warranty information for your supplies.
Step 1: Determine which printhead is lacking
If, later repeated printhead cleaning, the Impress Quality Diagnostic folio shows white lines across the color blocks in Test Pattern 2 (merely no white lines in the gray blocks in Exam Pattern 3), one or both of the printheads will have to exist replaced. The Impress Quality Diagnostic page shows which printhead should exist replaced.
Look at the color blocks labeled Test Blueprint 2. Some of them should show white horizontal streaks (if none of the blocks are streaked, the printheads are okay).
| Figure : Streaked blackness, crimson, or dark-green color blocks - replace Black/Yellow Printhead |
| Figure : Streaked cyan or magenta colour blocks - supplant Cyan/Magenta Printhead |

Step 2: Remove the defective printhead
-
Load plain white paper into the tray.
-
Open the carriage access door.
Figure : Open the carriage access door
-
Touch Modify Printheads on the printer command panel. The carriage moves to the access area on the left side of the printer. Look for the carriage to cease moving.
-
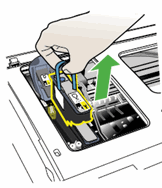
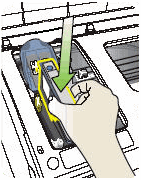
Elevator the printhead latch.
Figure : Lift the printhead latch
-
Lift the handle of the old printhead, and and so use it to pull the printhead out of its slot.
Figure : Remove the printhead
Step 3: Install the new printhead
-
Milk shake the printhead up and down at least six times while the printhead is still in its packaging.
Figure : Shake the printhead six times

-
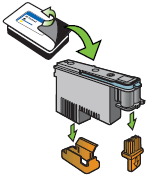
Remove the printhead from its packaging, and and then remove the orangish protective caps from the nozzles.
Effigy : Remove the printhead and the protective caps
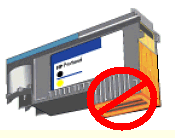
caution:
Do not impact the nozzles on the printhead. Touching the nozzles tin permanently damage the printhead.
Figure : Do not touch on the printhead nozzles
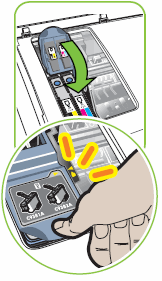
-
Insert the printhead into its color-coded slot. The label on the printhead must match the label on the printhead latch. Press downwards firmly on the printhead to ensure proper contact.
-
Insert the Black/Xanthous printhead into the slot on the left.
-
Insert the Magenta/Cyan printhead into the slot on the right.
Figure : Insert the printhead into its slot
-
-
Echo these steps if necessary to replace the other printhead.
note:
Make sure that you milk shake the other printhead back and forth six times before installing it.
-
Pull the printhead latch all the way forward, and then press downwardly to make certain that the latch engages. You might take to apply some pressure to engage the latch.
Figure : Lower the printhead latch
-
Close the carriage access door.
Figure : Close the carriage admission door
-
Look while the printer aligns the printheads and prints an alignment page, and then touch OK.
-
Print another Print Quality Diagnostics Page. If Test Pattern 2 however displays white lines beyond the color blocks, go along to the next solution.
-
How to print a Print Quality Diagnostics Folio
-
Load plain white paper into the tray.
-
On the control console, bear upon the Right Arrow (
) to brandish the 2nd navigation screen. -
Impact Setup (
). -
Touch the Down Arrow (
), and and so bear upon Reports. -
Touch Print Quality Study. The Print Quality Diagnostics Page prints.
-
-
-
Cheque the Print Quality Diagnostics Folio for whatsoever defects.
Solution seven: Service the printer
Service or replace your HP production if the issue persists after completing all the preceding steps.
Go to Contact HP Customer Support to schedule a product repair or replacement. If you are in Asia Pacific, you will be directed to a local service center in your expanse.
To confirm your warranty status, go to HP Production Warranty Cheque. Repair fees might apply for out-of-warranty products.
note:Go along a print sample that shows the problem. If the ink cartridges, printhead, or printer is replaced nether warranty, the back up agent volition request the impress sample. If the printer is returned to HP, the impress sample must be returned with the printer. Identify the sample in the output tray when yous package your printer for shipping.

Source: https://support.hp.com/us-en/product/hp-officejet-pro-8500a-e-all-in-one-printer-series---a910/4083864/model/4083967/document/c02208875
Posted by: walshthowelf1956.blogspot.com
0 Response to "Where To Service An Hp Officejet Pro 8500a Printer"
Post a Comment